So, this type of dancing is usually considered vulgar and skanky, since so many associate it with hookers at bars on their poles. Yeah, it gives the pole a pretty bad rap. Luckily, the pole is much more recognized as an art, and not from the American 1980's striptease we so often associate it with.
In fact, just a little bit of history, it may have started in America in the 1910s to 1920s because of the popularity of travelling performers, like the cirucs. Acrobats and dancers most likely practised on tent poles by using it as a prop, and it became more accepted into the burlesque culture in the 1950s.
Sadly, it soon became known as a 'dirty' form of dancing as it was related to striptease in bars, and still has a somewhat bad name.
If you don't believe me, would you ever consider asking your mother to take a pole dancing class? Or mothers, would you let your daughter buy a pole to practice on? Yeah, I do think it is a somewhat sexy form of dancing, but it is empowering, kindof like the corset, to a woman.
So, as an art form, i find it mesmirising to watch the no-gravity stunts pulled off by these people.
If ever you feel like trying it out, it looks like alot of fun. Just make sure to buy a pole that is sturdy and will not fall over on you! Too many videos on youtube of pole dancing failures have warned me from bad manufacturing...
Not so much on this subject, it just looks like a fun workout to me, really.
Check out an up-coming blog about corsets, I really want to get one!

Tuesday, December 14, 2010
Monday, December 13, 2010
Vintage Makeup- Diagrams
So, today I have decided a good way to portray how the makeup was applied 60 years ago is by using a MAC face chart. These handy little charts let you do whatever makeup you want on a blank slate, so to speak, within the limits of your imagination.
Here is a blank chart:
 Feel free to copy it, or get your own off google or something. The point is, you can print it and then colour it according to the look you are going for,and choose to post it or use it on yourself.
But, since I cannot seem to scan on my printer, I have done up several models from instyle.com's virtual makeover in vintage style instead. So here are some that I have done, sporting several different combinations of eyeshadow and lipstick that could inspire you're own vintage look.
 Here is the classic vintage look: red lips and brown eyeshadow. Very timeless, but also add some darkness to those eyebrows, I couldn't do it on the virtual makeover.
 For all the gingers out there (sorry if your offended by being called a ginge) try a sea green eyeshadow and pink rose lipstick, very flower garden-like.
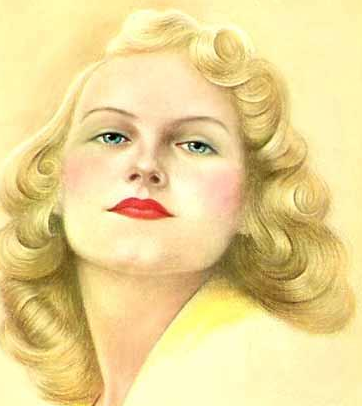
 A great example of apricot lips, this blondie also has matching blue eyeshadow to her eyes. Many girls in the 1950s matched their eye shadows; green for green, brown for brown, etc. Nice combination
 Very much a late 50s, early 60s look, the eyes are dark under the lashes. This reminds me of Twiggy's signature look. Again, the apricot lips were popular and it is complimented with a purple eyeshadow.


 And finally, a dark lip with lilac eyes, a pretty common combination. Also, note the pale, flawless complexion on all the models, even the darker ones. This pancake-like face makeup was used to cover all sorts of blemishes and uneven skin tones; an attempt to be just like the actresses of the day.
So have fun with your own virtual makeover, or even better print out and colour the makeup chart to see how you will do your vintage makeup!
Here is a blank chart:

But, since I cannot seem to scan on my printer, I have done up several models from instyle.com's virtual makeover in vintage style instead. So here are some that I have done, sporting several different combinations of eyeshadow and lipstick that could inspire you're own vintage look.


This is a bit more clown-ish because the lips are so bright and shiny, but this may work better if the lips were a more faded peach perhaps. But, the lilac shadow stands out and the winged liner is very evident.

Using a darker rose lip, this works best with a coppery brown shadow with golden skin. Again, these are extremely fun to do and there are about two more examples...

The first use of a grey shadow, this can work with almost any lipstick colour, except maybe a hot pink where it may come off a bit trashy and not so vintage-y. An even darker lip for a darker skin tone, this shade has plum under-tones which look very good with darker skin.

So have fun with your own virtual makeover, or even better print out and colour the makeup chart to see how you will do your vintage makeup!
Sunday, December 12, 2010
Makeup Lessons: 1950s
The Glamorous 1950's
Most people look back on those actresses of the 1950s, and often feel they should have been born in a different era. Well, a step closer to that is dressing like you are in the 1950's, and a key part of that is makeup.
 Explained here, achieving this look requires some effort and a lot of powder. Just adding some red lipstick to a plain face may have worked for your grandmother, and maybe you, but going glamorous means a lot more than just that.
In the above photo, Jane Russel appears to have on the following:
- Red Lipstick
- Foundation
- Powder
- Blush
- Eyebrow pencil
- Eyeshadow
- Eyeliner
- Mascara
Of course, no one is this perfect, and don't expect to be. These actresses had pancake faces of matte makeup- shine really only appeared on their lips. The step by step process would only authentically be explained by your grandmother, or mother, depending on how old you are. So, I concerned myself with what my grandmother wears, and used to wear (shown in photos) on her face.
So, in general, here is what you need and the process of applying it to your face.
- Matte foundation
- Powder, a shade or two lighter than your skin
- A light and medium brown matte eyeshadow
- Optional: a light and medium shade of blue, green, purple or grey
- Rosy coloured blush, a shade which compliments your skin tone
- An eyebrow pencil, some shades darker than your hair colour
- Red lipstick, matte
- Optional: pastels in pink, red orange, peach, fuchsia
- Lip liner, matching lipstick
It's a lot, I know, but compare it to your everyday makeup application.
So, now to apply it.
First off, the foundation. Some used liquid and others used pressed power. Whichever you are used to. This is supposed to be matte, and should cover any imperfections to give you a flawless complexion of an ideal, 'peaches and cream' colour. Some powder, one or two shades lighter, will give a paler look, popular of the 50's.

Next, pencil in the eyebrows. Choose a darker pencil for light hair, but match with darker hair. The eyebrows were usually plucked to get a highly arched brow. They were filled in to become darker and give even more shape to the eye.
The eyes, during the day, were supposed to be natural looking and fresh. However, for a more glamorous look eyeshadow and eyeliner were added to give extra glamour. Brown was a common shadow used, but other colours, like green, purple, blue and grey were also popular. The lighter shade was done all over lid and a bit above the crease; the darker shade applied in the crease. Liquid eyeliner was used as a cat-eye shape, and fake lashes can be applied to the outer corners if wanted. Mascara should be applied if needed as well.

Now the cheeks! To get a rosy flush, take a fluffy blush brush (say that three times fast) and apply it to the apples of your cheeks. For darker shades, apply to cheekbones as it would look out of place on your apples.

Define your lips with a lip pencil that matches your lip shade. Fill in if you want your colour to be long lasting.
The lips should be any matte colour, and applied either directly from the tube or using a lip brush; whichever is more comfortable. Rub lips together (not side to side) to evenly distribute the colour on both sides of your lips. Take a tissue between lips to remove excess, and to prevent lipstick on your teeth, take your finger and put it on your mouth. Pull it out, making an 'o' shape with your mouth. This should remove any lipstick on the inside of your lips which could transfer to your teeth.

And finally, for 'something more', take your eyebrow pencil and add a beauty mark close to your lips or on your upper cheek. Or even better, define an already existing beauty mark on your face. It is never a mole on a 1950s woman; always a beauty mark.
Give a once over in the mirror, making sure nothing is out of place, especially if you are wearing red lips. Red is a bright colour and can appear sloppy if on an unflawless face or applied roughly. Check out the post on 1950s hair to match your makeup.

Hope to hear from your comments!
Most people look back on those actresses of the 1950s, and often feel they should have been born in a different era. Well, a step closer to that is dressing like you are in the 1950's, and a key part of that is makeup.

In the above photo, Jane Russel appears to have on the following:
- Red Lipstick
- Foundation
- Powder
- Blush
- Eyebrow pencil
- Eyeshadow
- Eyeliner
- Mascara
Of course, no one is this perfect, and don't expect to be. These actresses had pancake faces of matte makeup- shine really only appeared on their lips. The step by step process would only authentically be explained by your grandmother, or mother, depending on how old you are. So, I concerned myself with what my grandmother wears, and used to wear (shown in photos) on her face.
So, in general, here is what you need and the process of applying it to your face.
- Matte foundation
- Powder, a shade or two lighter than your skin
- A light and medium brown matte eyeshadow
- Optional: a light and medium shade of blue, green, purple or grey
- Rosy coloured blush, a shade which compliments your skin tone
- An eyebrow pencil, some shades darker than your hair colour
- Red lipstick, matte
- Optional: pastels in pink, red orange, peach, fuchsia
- Lip liner, matching lipstick
It's a lot, I know, but compare it to your everyday makeup application.
So, now to apply it.
First off, the foundation. Some used liquid and others used pressed power. Whichever you are used to. This is supposed to be matte, and should cover any imperfections to give you a flawless complexion of an ideal, 'peaches and cream' colour. Some powder, one or two shades lighter, will give a paler look, popular of the 50's.

Next, pencil in the eyebrows. Choose a darker pencil for light hair, but match with darker hair. The eyebrows were usually plucked to get a highly arched brow. They were filled in to become darker and give even more shape to the eye.
The eyes, during the day, were supposed to be natural looking and fresh. However, for a more glamorous look eyeshadow and eyeliner were added to give extra glamour. Brown was a common shadow used, but other colours, like green, purple, blue and grey were also popular. The lighter shade was done all over lid and a bit above the crease; the darker shade applied in the crease. Liquid eyeliner was used as a cat-eye shape, and fake lashes can be applied to the outer corners if wanted. Mascara should be applied if needed as well.
Now the cheeks! To get a rosy flush, take a fluffy blush brush (say that three times fast) and apply it to the apples of your cheeks. For darker shades, apply to cheekbones as it would look out of place on your apples.

Define your lips with a lip pencil that matches your lip shade. Fill in if you want your colour to be long lasting.
The lips should be any matte colour, and applied either directly from the tube or using a lip brush; whichever is more comfortable. Rub lips together (not side to side) to evenly distribute the colour on both sides of your lips. Take a tissue between lips to remove excess, and to prevent lipstick on your teeth, take your finger and put it on your mouth. Pull it out, making an 'o' shape with your mouth. This should remove any lipstick on the inside of your lips which could transfer to your teeth.
And finally, for 'something more', take your eyebrow pencil and add a beauty mark close to your lips or on your upper cheek. Or even better, define an already existing beauty mark on your face. It is never a mole on a 1950s woman; always a beauty mark.
Give a once over in the mirror, making sure nothing is out of place, especially if you are wearing red lips. Red is a bright colour and can appear sloppy if on an unflawless face or applied roughly. Check out the post on 1950s hair to match your makeup.

Hope to hear from your comments!
Friday, December 10, 2010
1950's Vintage Hair
Achieving the Authentic Look
Most of the time, when you see a YouTube tutorial for vintage hair, it may come across as being 'modern' or not 'genuine'. This is because many take the easy road and use today's hair straighteners and curling irons to get the look without considering how fake it may look. Ever seen those tutorials? I'm not saying they are totally bogus, just off-base for the authenticity I am always looking for.
So, to get the old glamour rarely seen in today's society, mimic what they did 60 years ago!
Ever heard of pin-curling? This is an age-old technique that gave the ladies of the 1950's their beautiful wavy curls, without the use of hair-damaging heat. It is not easily explained, so the link below will give a good tutorial from VividMakeup on pin-curling 101. I adore her tutorials, and I recommend watching her other vintage hair/makeup videos as well!
http://www.youtube.com/watch?v=cRY5Q2_IMqs
(It also includes a part two by the way.)
So, as you can see in the link, she is very good at explaining the techniques about pin-curling. In fact, if you want to go all out, look up some setting patterns on the Internet and see what you can find! I just bought a book off amazon.com which is loaded with old setting patterns from the 1950s.
Getting this look is not easily done by today's methods, but you will easily find yourself getting the hang of it if you try the old ways of 60 years ago.
Nowadays, you just don't find the glamour and stance in today's actresses, much less the purpose. Why is Kim Kardashian famous anyway?

She is beautiful, and pretty gutsy to stand up to constant pressure from the press, but to get my point of rare glamour in today's world, compare Kim to Grace Kelly, below.

She is even in pearls! Classy or what? Getting this look was achieved by pin curls, liquid eyeliner, flawless foundation, and red, red lips. It's just timeless. Of course there is a tutorial on how to achieve the type of makeup look we are going for on VividMakeup's YouTube channel, I suggest checking it out.
But we are still on hair. If you didn't watch the tutorial, or got bored, I can list the basics right here:
- Slightly damp hair
- Hairspray, extra-hold
- Double or single prong clips (flat, no bumps)
- Spare time
- Medium haircut
- Wire bristle brush
- Regular hairpins
Step 1: Wet hair from shower/bath whatever. Brush out, best results with medium length hair (just below the shoulders).
Step 2: Curl your hair with your fingers into a neat curl (decide if reverse or forward) and pin down with prong clips. Should make neat rosebud curl on head.
Step 3: Leave in for at least 5 hours, or overnight for better results. Use a hairnet to hold the hair to the head.
Step 4: Take out, the curls will be springy and bouncy. Brush in direction desired, and don't be afraid to brush them out, they will not lose their shape!
Step 5: Pin hair up in an up do if desired, or just play around with different shapes. It's quite fun!
So, just some tips on how to do your hair, and general look for 1950s vintage. Hopefully this was a basic starter explanation on pin-curling, and check out some photos from the 1950s of women in their pin curls.


And results from after they were taken out and hairsprayed up...


In order, Jayne Mansfield; Elizabeth Taylor; Jane Russel; Marilyn Monroe; Rita Hayworth, and Tuesday Weld. Hope this was helpful!
Achieving the Authentic Look
Most of the time, when you see a YouTube tutorial for vintage hair, it may come across as being 'modern' or not 'genuine'. This is because many take the easy road and use today's hair straighteners and curling irons to get the look without considering how fake it may look. Ever seen those tutorials? I'm not saying they are totally bogus, just off-base for the authenticity I am always looking for.
So, to get the old glamour rarely seen in today's society, mimic what they did 60 years ago!
Ever heard of pin-curling? This is an age-old technique that gave the ladies of the 1950's their beautiful wavy curls, without the use of hair-damaging heat. It is not easily explained, so the link below will give a good tutorial from VividMakeup on pin-curling 101. I adore her tutorials, and I recommend watching her other vintage hair/makeup videos as well!
http://www.youtube.com/watch?v=cRY5Q2_IMqs
(It also includes a part two by the way.)
So, as you can see in the link, she is very good at explaining the techniques about pin-curling. In fact, if you want to go all out, look up some setting patterns on the Internet and see what you can find! I just bought a book off amazon.com which is loaded with old setting patterns from the 1950s.
Getting this look is not easily done by today's methods, but you will easily find yourself getting the hang of it if you try the old ways of 60 years ago.
Nowadays, you just don't find the glamour and stance in today's actresses, much less the purpose. Why is Kim Kardashian famous anyway?


She is even in pearls! Classy or what? Getting this look was achieved by pin curls, liquid eyeliner, flawless foundation, and red, red lips. It's just timeless. Of course there is a tutorial on how to achieve the type of makeup look we are going for on VividMakeup's YouTube channel, I suggest checking it out.
But we are still on hair. If you didn't watch the tutorial, or got bored, I can list the basics right here:
- Slightly damp hair
- Hairspray, extra-hold
- Double or single prong clips (flat, no bumps)
- Spare time
- Medium haircut
- Wire bristle brush
- Regular hairpins
Step 1: Wet hair from shower/bath whatever. Brush out, best results with medium length hair (just below the shoulders).
Step 2: Curl your hair with your fingers into a neat curl (decide if reverse or forward) and pin down with prong clips. Should make neat rosebud curl on head.
Step 3: Leave in for at least 5 hours, or overnight for better results. Use a hairnet to hold the hair to the head.
Step 4: Take out, the curls will be springy and bouncy. Brush in direction desired, and don't be afraid to brush them out, they will not lose their shape!
Step 5: Pin hair up in an up do if desired, or just play around with different shapes. It's quite fun!
So, just some tips on how to do your hair, and general look for 1950s vintage. Hopefully this was a basic starter explanation on pin-curling, and check out some photos from the 1950s of women in their pin curls.


And results from after they were taken out and hairsprayed up...


In order, Jayne Mansfield; Elizabeth Taylor; Jane Russel; Marilyn Monroe; Rita Hayworth, and Tuesday Weld. Hope this was helpful!
The First Post
So, Welcome!
As my first post, I can address some topics I may cover on my blog.
- Vintage hair, makeup, clothes and other
- Witchcraft and kitchen witchery
- Historic buildings of America and Europe
- Travelling
These include random, yet authentic ramblings on my favourite topics, which you may enjoy yourselves! Hope for comments in a couple months once I get this blog up and going... this is my first day after all.
Subscribe to:
Posts (Atom)